Sunday, June 28, 2009

Barbeque Baby Shower

My next adventure is a Barbecue Baby Shower. This was a theme that was the choice of the mother-to-be. She thought it would be a great way to incorporate her husband without it being to girly.

I have been searching the Internet and ran across the idea of using Mason Jars instead of plain old paper cups. This is one idea that I can't wait to use.

Check out this fantastic mason jars at this barbeque baby shower by Beth Helmstetter. You can check out the full shower here.

I’m in love with this clever barware idea from Brides.com. I came across this idea while browsing one of my favorite blogs–The Hostess with the Mostess.

Sunday, June 21, 2009

Ray of Sunshine Baby Shower Finale

Well the shower was a great success. I could have not done it without my crew. Thank you so much Emesha and Oyin. Love you guys!

Here is the lovely couple, Nicole and Randy. This baby is going to be Gorgeous! We did a sweet heart table for them and made them the center of attention. The table setting was white table clothes with a sage overlay. The chair backs where decorated with purple & green sashes. The centerpiece was a stork that I picked up from Home Goods.


When the guest arrived, we had them create a baby onesie. They were very creative and rather funny.

Table Setting


Each table was set with white table clothes and an organza overlay of purple and yellow. The plates were yellow and green with purple napkins wrapped with a baby pacifier. On each table were menus in the colors of the celebration.


Centerpieces

We used topiaries adorned with fresh flowers and fresh flower boxes with pregnant dress forms. The flower boxes are at Michael's and the Topiaries were a find from Home goods. The dress forms were purchased from Tamarco Inc.


Wishing Tree

The wishing tree was a great success. The parents-to-be thought this was a great idea to read the advice and best wishes from all of their guests. Unfortunately, I didn't get a picture after it was filled up with all of the wishes. It looked spectacular!


Cake


The cake was very cute and matched perfectly to the decor.


Candy Buffet

Well as we all know, the candy buffet is always a huge hit. You just can't go wrong with it. We wanted this sections to POP so we used satin table clothes. For a back drop, I found great packed grass from home goods and yellow spray flowers. And of course, the big lollipop which I love from elegant gourmet .


Thursday, June 18, 2009

Race Car Party

This was my sons 2nd Birthday Party. I figured since I shared Age 1 and 3, why not show 2. Bailey was really into the movie Cars, so I decided to create a custom race car party for him and a few of his racing buddies.
Invite
This was the inside of the invitations. They were rolled up and a toy race car was inside. The invitations were placed in red tin cans that I purchased from Michael's. On the outside of the can the label stated Bailey's 2nd Birthday. The parents and the kids were excited about these invitations. I wish that I would have taken a picture of the can, but of course I forgot.

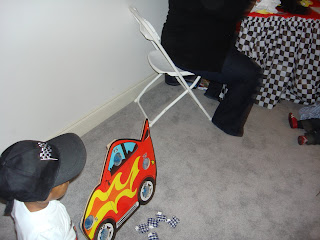
Here is the Birthday Boy all dressed up and ready to race!

I got the 3D car from Shindigz, which is a great place for party props.

To begin, every child received a t-shirt that said "Bailey's 2nd Birthday".

I wanted the party to be a little of an adventure so I created different stations for the kids. This was in order for them to get their license to drive in the big race at the end of the party.

The first station was an eye test. This was a bean bag toss into a race car.


The next station was the Tags and Title Station where the kids created their own tags with foam letters and car applique's. The kids really enjoyed this creative station.


Following getting their tags, we needed to test their driving skills. The older kids had their driving test on the WII station and the smaller kids used the Smart Cycle Hot Wheels game. They all had a blast with this. After the driving test, I handed out pre-made drivers licences to each kid. In order to do this, I asked each parent to send me a head shot prior to the party.

After the kids had their driving test we knew it was time for a "Pit Stop". The kids needed to refuel with food in order to get ready for the big race. We had the eating area set up in a different room. Below are some of the decorations. I got the materials for the car centerpiece from awesome events.


Next was the big race. I made cars out of cardboard boxes and each kid had a helmet. Then we separated the kids into two teams. This portion of the party was a big hit for the bigger kids, the smaller kids were a little reluctant at first, but after they saw all the fun they made their way in the race.

Following the race, all of the kids received metals and then had race car cake. We got this cake from Sugar Bakers in Baltimore. It was really really good! The cupcakes came from Cakes Plus. Since we love both bakers we needed to share the love.

We then made sure that all of the kids took their Polaroid picture in the car. The pictures were placed in a photo car frame and given to each guest.

At the finish line were the favors. I uses race car helmets, turned them upside down and filled them with everything race car. A lot of the items came from Oriental Trading, but I found the perfect wooden race car with the #2 on it from the Target dollar section. They bring these back from time to time.

Thursday, June 11, 2009

Cookie Buffet

So thanks to you great readers, you lead me to the blog of Most Likely Late and her fabulous cookie buffet. This one is by far my favorite. I love the fabulous details to include milk on ice! I'm sure most of you have seen this, but I thought it deserved another round of applause. Super Cute! I can't wait to take inspiration from this and have my very own cookie buffet! If you haven't already, go check out the entire safari baby shower at Most Likely Late

Saturday, June 6, 2009

Wish Tree

Remember last month when I posted a fabulous wish tree. Well, while I have been walking everyday(yeah me), I have stumbled upon some great tree branches. I thought these would be wonderful to make my own "Ray of Sunshine" Wishing Tree. Below is the beginning of my adventure. Once I add on the crystals and the flowers, I think it will turn out pretty good. "Wish" me luck!

Related Posts with Thumbnails